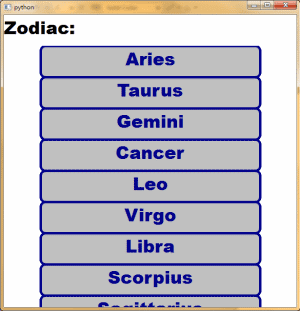
本文將要說明如何將PySide中的string list當成data model,讓QML可以顯示它。首先,我們先看看Python的程式部分。
這邊我們不多廢話的說明QML使用model的方法,這方面的資訊可以到QML的文件去查。這個QML中的重點有兩個地方,第一個就是我們要將前面PySide所指定的exampleModel property透過的model屬性指定給ListView。第二就是在ListView的delegate裡面,當string list指定給QML後,我們要記得此時預設的資料的role是叫做modelData。所以我們只需要在要顯示資料的地方放上modelData,string list的內容就會一個接著一個的被取出來。就是這麼簡單!

#!/usr/bin/env python
# coding: utf-8

import sys
import codecs

# Workaround to handle exception of cp65001 issue.
try:
    codecs.lookup('cp65001')
except:
    def cp65001(name):
        if name.lower() == 'cp65001':
            return codecs.lookup('utf-8')
        codecs.register(cp65001)


from PySide.QtCore import *
from PySide.QtGui import *
from PySide.QtDeclarative import *

# The string list to show.
Zodiac = [
    'Aries',
    'Taurus',
    'Gemini',
    'Cancer',
    'Leo',
    'Virgo',
    'Libra',
    'Scorpius',
    'Sagittarius',
    'Capricornus',
    'Aquarius',
    'Pisces',
    ]

app = QApplication(sys.argv)

view = QDeclarativeView()

# Set model to view's context.
ctx = view.rootContext()
ctx.setContextProperty('exampleModel', Zodiac)
view.setResizeMode(QDeclarativeView.SizeRootObjectToView)
view.setSource(QUrl('main.qml'))
view.show()
app.exec_()
這裡,我們建立了一個string list名為Zodiac,裡面放的就是黃道十二宮的名稱。要將任何資料由PySide傳遞給QML,最簡單的方式就是透過setContextProperty()來做。我們將Zodiac這個string list透過setContextProperty()將其命名為exampleModel,然後傳給QML。 PySide的部份就是這麼簡單,接下來就是QML的工作了。讓我們看看QML這邊要怎麼做:import QtQuick 1.0
Rectangle {
width: 600
height: 600
Text {
id: caption
anchors.top: parent.top
anchors.left: parent.left
anchors.right: parent.right
height: 64
text: "Zodiac:"
font.pixelSize: 36
font.family: "Arial Black"
}
ListView {
anchors.top: caption.bottom
anchors.left: parent.left
anchors.bottom: parent.bottom
anchors.right: parent.right
clip: true
/* exampleModel is passed from main.py by setContextProperty(). */
model: exampleModel
delegate: Component {
Rectangle {
color: "silver"
width: 450
height: 64
border.color: "DarkBlue"
border.width: 5
anchors.topMargin: 10
anchors.bottomMargin: 10
anchors.leftMargin: 10
anchors.rightMargin: 10
anchors.horizontalCenter: parent.horizontalCenter
radius: 10
Text {
anchors.horizontalCenter: parent.horizontalCenter
/* The role of data in string list which made by PySide is
* 'modelData'. So we use modelData here to get the content
* of data.
*/
text: modelData
font.pixelSize: 36
font.family: "Arial Black"
color: "DarkBlue"
}
}
}
}
}

留言